Dockerizing our Machine Learning Model
Introduction
Deploying models from one computer to another can often lead to conflicts such as build failures, library version mismatches, and missing components. Containerization aims to solve these challenges and more.
This article explores the process of containerizing our model as a docker container.
This article is a sequel to "Productionalization of Machine Learning Models" available here. Kindly go through that article before proceeding with this one.
Brief Introduction to Docker
Docker offers a more efficient approach to system virtualization by providing a minimalistic environment that only includes the essential tools and software for running an application.
Some essential keywords when working with docker:
Container: A container is a lightweight and stand-alone executable software package that includes everything needed to run a piece of software, including the code, runtime, system tools, system libraries, and settings.
Image: An image is a lightweight, stand-alone, and executable software package that contains the application code, runtime, libraries, and other dependencies. It's a blueprint for creating containers.
Dockerfile: A Dockerfile is a text file containing a set of instructions that are used to build a Docker image. It specifies the base image, required dependencies, environment variables, and commands to set up the image.
Registry: A Docker registry is a centralized repository for storing Docker images. Docker Hub is the default public registry, but you can also set up private registries for internal use.
Repository: A Docker repository is a collection of related Docker images tagged with different versions. Each repository can have multiple images, typically representing different stages or versions of an application.
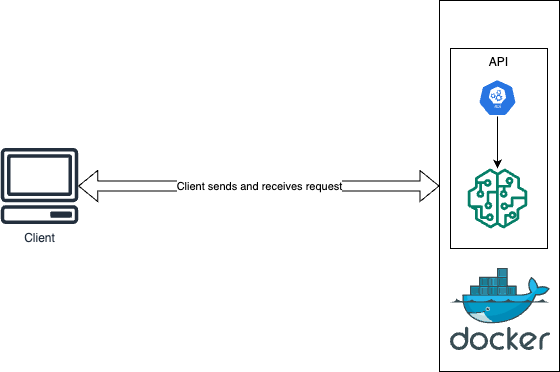
In the last article, we developed and served our ML model via Flask API. Right now, let's package that app in a docker container.
Let's get to it!
Firstly, ensure that you have docker installed in your system. If not, you can download it on docker's website.
Let's modify our Flask API from the previous article to specify the port and host for running our app.
 .
 .
 .
 if __name__ == "__main__":
     app.run(port=80, host="0.0.0.0")
Create a file called
Dockerfile(without any extension). This file would contain some instructions needed to build our image and container.Include the following code in the
Dockerfile# Use an official Python runtime as a parent image FROM python:3.8-slim-buster # Set the working directory to /app WORKDIR /app # Copy the current directory contents into the container at /app COPY . /app # Copy the requirements.txt file into the container COPY requirements.txt . # Install any needed packages specified in requirements.txt RUN pip install --no-cache-dir -r requirements.txt # Make port 80 available to the world outside this container EXPOSE 80 # Run app.py when the container launches CMD ["python", "app.py"]Build and Run the Docker Image:
Build the Docker image:
docker build -t flask-app .Run the Docker container:
docker run -p 4000:80 flask-app
And that's it!
Testing our container
Now let's call our docker container from our client code using port 4000: http://127.0.0.1:4000.
using System;
using System.Net.Http;
using System.Net.Http.Json;
using System.Text.Json;
using System.Threading.Tasks;

class Program
{
    static async Task Main(string[] args)
    {
        // Define the API endpoint URL
        var apiUrl = "http://127.0.0.1:4000/predict";

        // Input data for prediction
        var input = new { data = new[] { 1500 } }; // Example input data (sqft_living)

        using HttpClient client = new HttpClient();
        try
        {
            var response = await client.PostAsJsonAsync(apiUrl, input);

            if (response.IsSuccessStatusCode)
            {
                var predictedPrice = JsonSerializer.Deserialize<double[]>(await response.Content.ReadAsStringAsync());
                Console.WriteLine($"Predicted Price: {string.Join(", ", predictedPrice)}");
            }
            else
            {
                Console.WriteLine("Request failed with status code: " + response.StatusCode);
            }
        }
        catch (Exception ex)
        {
            Console.WriteLine($"Error: {ex.Message}");
        }
    }
}
Here is the result:

Conclusion
We have successfully packaged our model in a docker container. The code for this tutorial is available here.