Productionization of Machine Learning Models

Introduction
Deploying machine learning models is essential for making them useful to the public or expected users. In this article, we will explore the best ways to deploy your models for production scenarios.
There are two common architectural approaches to deploying models:
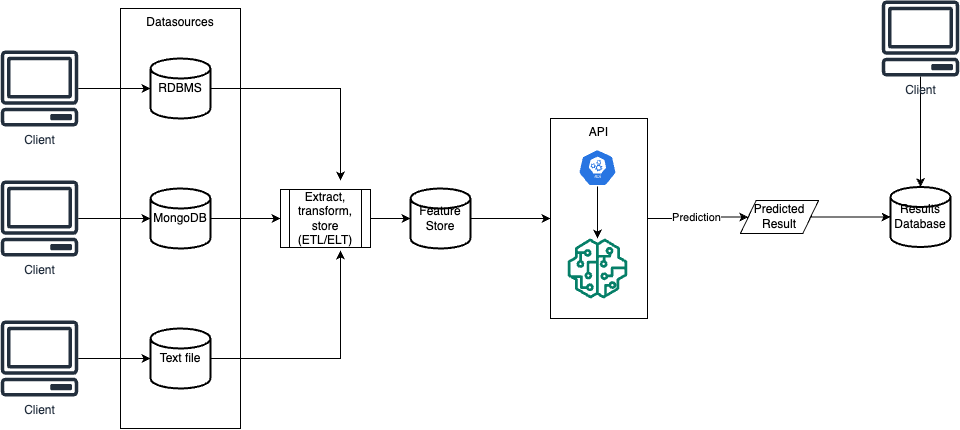
Batch Mode
To predict outcomes, we store variables in a datastore during batch mode. The batch runs on a scheduled interval and retrieves variables from the feature store to make predictions. These predictions are saved to a data store for client applications to access by simply polling the data store for predicted values.
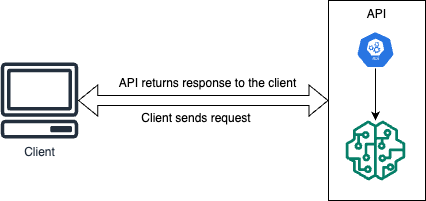
Real-time Mode
Our model is integrated into an API, enabling real-time predictions. The API endpoint is called with the independent variables included in the payload, the API endpoint will provide the predicted result.
We will be looking at the Real-time architecture in this article.
Let's get started!
Creating our model
First and foremost, we would create the model we will deploy. We will be building a simple linear regression to predict house prices in House Sales in King County, USA. The dataset is available here.
import useful libraries
      import numpy as np
      import pandas as pd
      from sklearn.model_selection import train_test_split
      from sklearn.linear_model import LinearRegression
      import pickle
import our dataset
  # Load the Kings County House Sales dataset
  data = pd.read_csv("kc_house_data.csv")
building our model
  # Using 'sqft_living' as feature and 'price' as target
  X = data["sqft_living"].values.reshape(-1, 1)
  y = data["price"].values

  # Split the data into training and testing sets
  X_train, X_test, y_train, y_test = train_test_split(
      X, y, test_size=0.2, random_state=42
  )

  # Create a linear regression model
  model = LinearRegression()

  # Fit the model to the training data
  model.fit(X_train, y_train)
Saving our model
To seamlessly load and utilize our model, we must first serialize it. Software engineering defines serialization as saving an object from memory, enabling ease of access and use. We will save our model - currently only in the computer's memory - to the disk and then load it as needed. Our preferred method for serialization is through the use of the Pickle library.
Install and import Pickle library.
import pickleSave our model.
  # Save the model using pickle
  with open("kings_county_model.pkl", "wb") as model_file:
      pickle.dump(model, model_file)
Exposing our model via APIs
The next step in the process is to expose our models via an API endpoint. We would be using Flask API here.
Install and import Flask library.
pip install Flask scikit-learn numpyCreate our endpoint and call our ML model.
  from flask import Flask, request, jsonify
  import pickle
  import numpy as np

  app = Flask(__name__)

  # Load the saved model
  with open('kings_county_model.pkl', 'rb') as model_file:
      loaded_model = pickle.load(model_file)

  @app.route('/predict', methods=['POST'])
  def predict():
      data = request.get_json(force=True)
      new_data = np.array(data['data']).reshape(-1, 1)
      prediction = loaded_model.predict(new_data)
      return jsonify(prediction.tolist())

  if __name__ == '__main__':
      app.run(debug=True)
Calling our model via a client
To consume our model, we'll create a client. For this purpose, we'll use a .NET C# client in this article, but feel free to use any programming language of your choice.
Create a new C# console project. We will call ours
ML-Model-Clientdotnet new console -n 'ML-Model-Client'Call the Model's endpoint
Add the following lines of code to the
Program.cs file.using System; using System.Net.Http; using System.Net.Http.Json; using System.Text.Json; using System.Threading.Tasks; class Program { static async Task Main(string[] args) { // Define the API endpoint URL var apiUrl = "http://127.0.0.1:5000/predict"; // Input data for prediction var input = new { data = new[] { 1500 } }; // Example input data (sqft_living) using HttpClient client = new HttpClient(); try { var response = await client.PostAsJsonAsync(apiUrl, input); if (response.IsSuccessStatusCode) { var predictedPrice = JsonSerializer.Deserialize<double[]>(await response.Content.ReadAsStringAsync()); Console.WriteLine($"Predicted Price: {string.Join(", ", predictedPrice)}"); } else { Console.WriteLine("Request failed with status code: " + response.StatusCode); } } catch (Exception ex) { Console.WriteLine($"Error: {ex.Message}"); } } }
Putting it All Together
To run the files, follow these steps:
Running
model_building.py:Open a terminal/command prompt and navigate to the directory where
model_building.pyis located. Then, run the script using the Python interpreter:python model_building.pyThis will build and export the linear regression model as
kings_county_model.pkl.Running the Flask App (
app.py):Open a new terminal/command prompt and navigate to the directory where
app.pyis located. Then run the Flask app using the Python interpreter:python app.pyThe Flask app will start, and the API will be accessible at
http://127.0.0.1:5000.Running the C# Client:
You'll need to compile and run the C# code using the dotnet CLI. Here are the steps:
Navigate inside the
ML-Model-Clientfolderdotnet buildRun the compiled C# client:
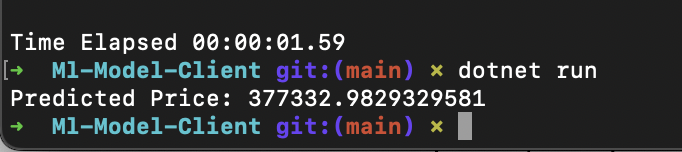
dotnet run
The C# client will send a POST request to the Flask API, receive the prediction response, and print the predicted price on the console. Here's the result of running mine:
Remember that the steps above assume you have installed the necessary software tools, including Python, Flask, and .NET SDK. Additionally, ensure that you run the scripts in the correct directories and that the Flask app is running before testing the C# client.
Conclusion
In this article, we have examined how to utilize our ML models in a production scenario. The code for this tutorial is available here.